
The Advanced level risk assessment process is the same for Specification and Safety File projects. The level of risk assessment of a Project is specified on creation of the Project. See Add Client project or Add Contractor project
Advanced level Risk Assessment provides the logged-in user with a composite page allowing the user to easily find an Activity or navigate the list of predefined risk Activity's that might pose a risk to the project. The logged-in user can complete the Initial Risk and Residual Risk ratings for each Potential Hazard.
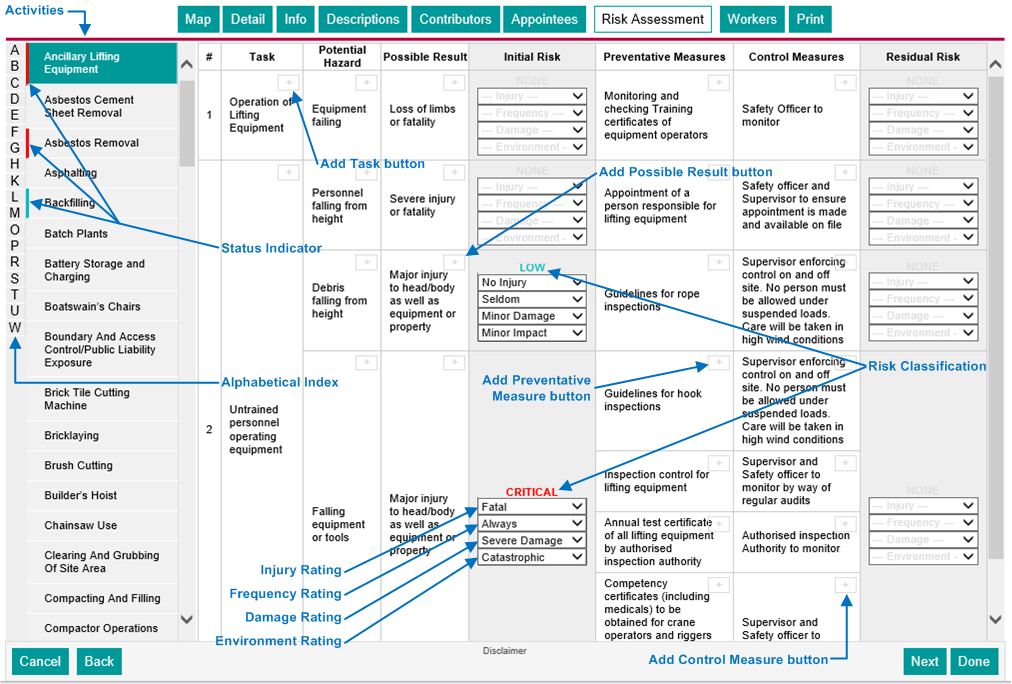
The first two columns on the left, labelled "Alphabetical Index" and "Activities" in the figure above, represent the predefined construction Activity's that might pose a risk to the project and is used to indicate the currently selected Activity and to navigate to any of the Activity's.
The second column from the left labelled "Activities" in the figure above, contains an alphabetical list of the predefined Activity's with the currently selected Activity shaded in a dark green. The left hand edge of each Activity indicates the status of the Activity.
The user can navigate to any Activity in the list by scrolling up or down if needed and clicking on the Activity.
The very first column from the left contains a list of characters in alphabetical order and can be clicked to scroll the list of Activity's (second column) to the relevant alphabetical position. It is simply a quick scroll to the relevant range in the Activity list.
Each Activity is subdivided into one or more Tasks allowing for more precise risk identification and mitigation. The logged-in user can add a Task not currently covered by the pre-defined Tasks.
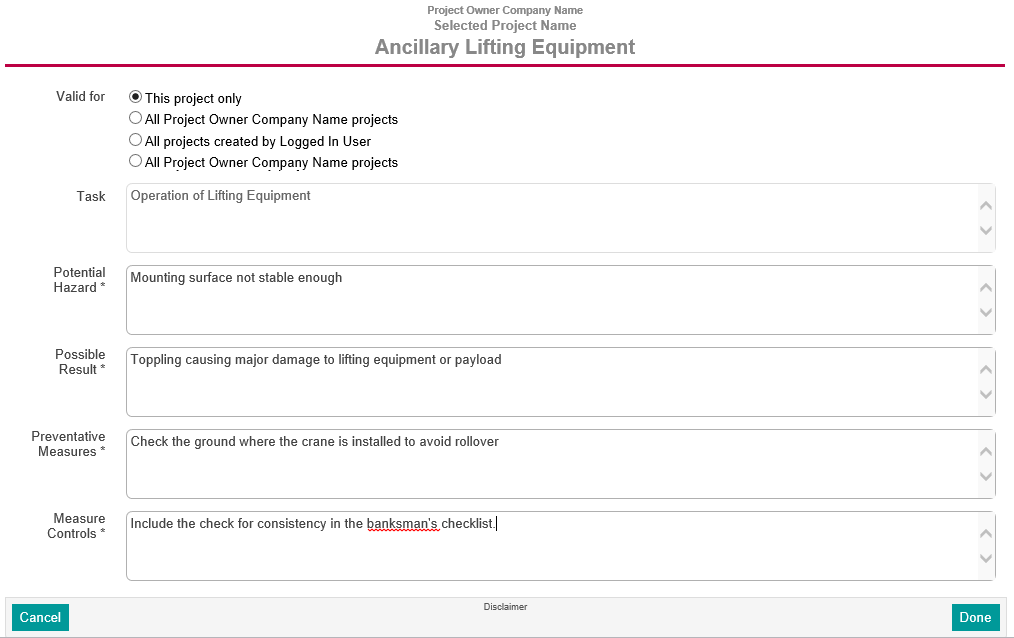
To add a Task to the currently selected Activity, the logged-in user must click on the + button in any of the existing Task cells. The New Risk Activity window is displayed.

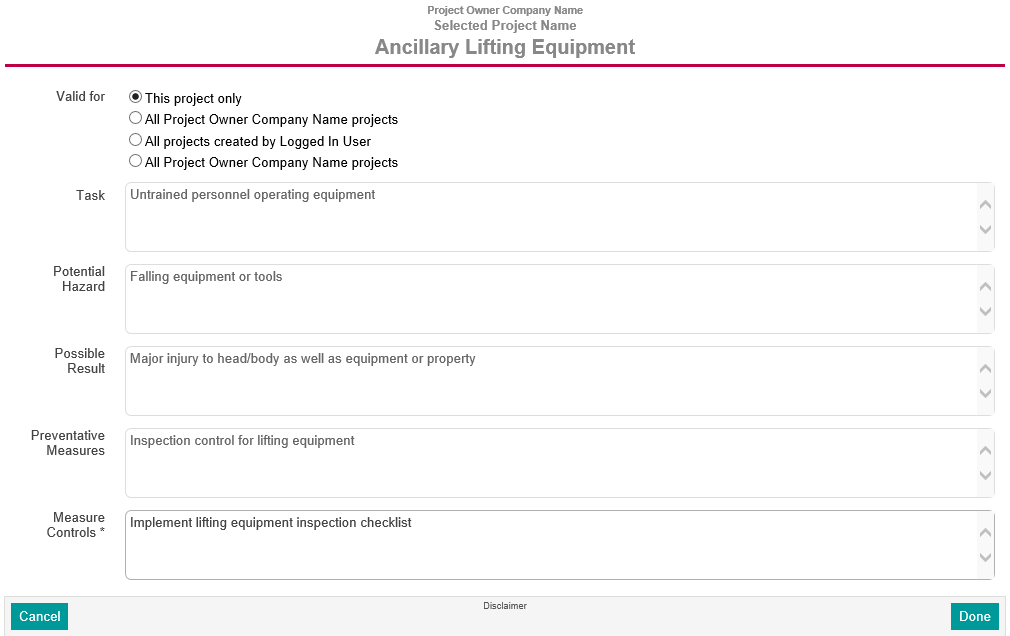
The logged-in user must supply the new Task value and a Potential Hazard value, a Preventative Measure value and a Control Measure value for the new Task. Additional Potential Hazards, Preventative Measures and Control Measures can be added once the new Task has been added.
The logged-in user can also set the scope of the added Task by selecting the option in the Valid for field.
Click the Done button to save the changes or the Cancel button to discard the changes.
The new Task is displayed at the bottom of the list of Tasks.

An added Task can be removed from the list by clicking the Delete button but only if not yet used by another Project in which case no Delete button will be displayed.
A Task with a scope of This project only is of course never used by other projects so should always allow deletion.
One or more hazards are identified for each Task. This allows for precise and complete hazard identification and minimises the requirement to manage composite hazards.
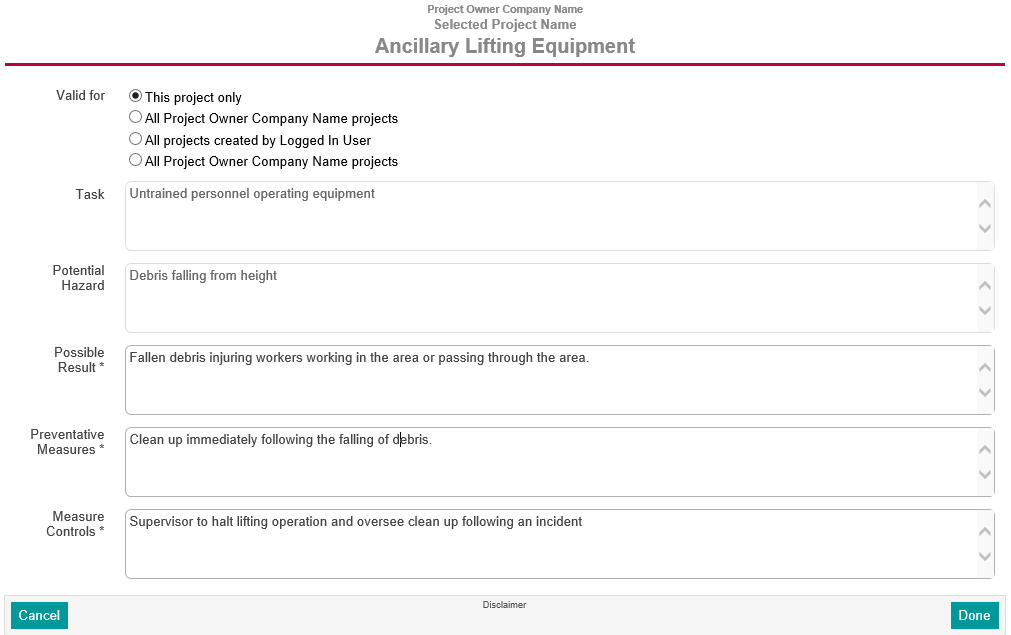
To add a Potential Hazard to the currently selected Task, the logged-in user must click on the + button in any of the existing Potential Hazard cells. The New Risk Activity window is displayed.
The Task field is not editable but displays the value of the parent Task. The logged-in user must supply the new Potential Hazard and a Possible Result, a Preventative Measure and a Control Measure for the new Potential Hazard. Additional Possible Results, Preventative Measures and Control Measures can be added once the new Potential Hazard has been added.
The logged-in user can also set the scope of the added Potential Hazard by selecting the option in the Valid for field.
Click the Done button to save the changes or the Cancel button to discard the changes.
The new Potential Hazard is displayed at the bottom of the list of Potential Hazards for the parent Task.

An added Potential Hazard can be removed from the list by clicking the Delete button but only if not yet used by another Project in which case no Delete button will be displayed.
A Potential Hazard with a scope of This project only is of course never used by other projects so should always allow deletion.
One or more Possible Results are identified for each Hazard. Defining results individually allows for a Possible Result to be assigned one or more Preventative Measures aimed at preventing the specific result.
To add a Possible Result to the currently selected Potential Hazard, the logged-in user must click on the + button in any of the existing Possible Result cells. The New Risk Potential Hazard window is displayed.
The Task and Potential Hazard fields are not editable but displays the value of the parent Potential Hazard and its parent Task fields. The logged-in user must supply the new Possible Result and a Preventative Measure and a Control Measure for the new Possible Result. Additional Preventative Measures and Control Measures can be added once the new Possible Result has been added.
The logged-in user must supply the new Possible Results and a Preventative Measure and a Control Measure for the new Possible Results. Additional Possible Results, Preventative Measures and Control Measures can be added once the new Possible Result has been added.
The logged-in user can also set the scope of the added Possible Result by selecting the option in the Valid for field.
Click the Done button to save the changes or the Cancel button to discard the changes.
The new Possible Result is displayed at the bottom of the list of Possible Results.
The new Possible Result is displayed at the bottom of the list of Possible Results of the parent Potential Hazard.
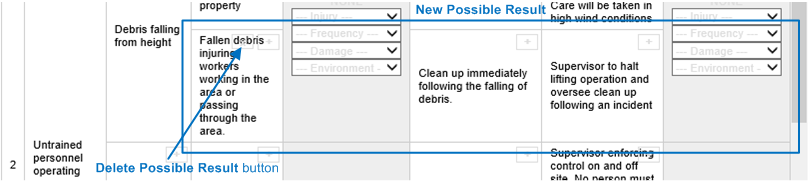
An added Possible Result can be removed from the list by clicking the Delete button but only if not yet used by another Project in which case no Delete button will be displayed.
A Possible Result with a scope of This project only is of course never used by other projects so should always allow deletion.
The initial risk column provides the user with the interface to assess the initially identified hazards. Each hazard is assessed in terms of four categories of risk namely severity of Injury, Frequency of occurrence, Potential Damage or loss and Environmental impact.
Injury Severity rating allows for the following options with values in brackets.
Frequency of Occurrence rating allows for the following options with values in brackets.
Potential Damage or Loss rating allows for the following options with values in brackets.
Environment rating allows for the following options with values in brackets.
The risk value is simply the sum of all options selected for the foue categories.
The risk Rating or Classification is determined as follows:
| Risk Classification | Risk Value |
|---|---|
| Low | 0 to 6 |
| Medium | 7 to 16 |
| High | 17 to 32 |
| Critical | 33 to 40 |
The Action Required based on the risk Rating or Classification is as follows:
| Risk Classification | Action Required | |
|---|---|---|
| Low | Supervision, training, certification, method/risk assessments, safe work procedures training, toolbox talks. | Good instruction. |
| Medium | Competent supervision, training certification, method/risk assessments, safe work procedures training, toolbox talks. | Change method, mitigate |
| High | Competent supervision, training certification, method/risk assessments, safe work procedures training, toolbox talks. | Change method, mitigate. |
| Critical | Close competent supervision, training certification, method/risk assessments, safe work procedures, PJO's, work permits, training, toolbox talks. | Intolerable, change method, transfer risk. |
One or more Preventative Measures are identified for each Possible Result aimed at preventing the specific result.
To add a Preventative Measure to the currently selected Possible Result, the logged-in user must click on the + button in any of the existing Preventative Measure cells. The New Risk Activity window is displayed.

The Task, Potential Hazard and Possible Result fields are not editable but displays the value of the parent Possible Result, it's Potential Hazard and its parent Task fields. The logged-in user must supply the new Preventative Measure and a Control Measure for the new Preventative Measure. Additional Preventative Measures and Control Measures can be added once the new Preventative Measure has been added.
The logged-in user must supply the new Preventative Measures and a Preventative Measure and a Control Measure for the new Preventative Measures. Additional Preventative Measures, Preventative Measures and Control Measures can be added once the new Preventative Measure has been added.
The logged-in user can also set the scope of the added Preventative Measure by selecting option in the Valid for field.
Click the Done button to save the changes or the Cancel button to discard the changes.
The new Preventative Measure is displayed at the bottom of the list of Preventative Measures..
The new Preventative Measure is displayed at the bottom of the list of Preventative Measure of the parent Possible Result.
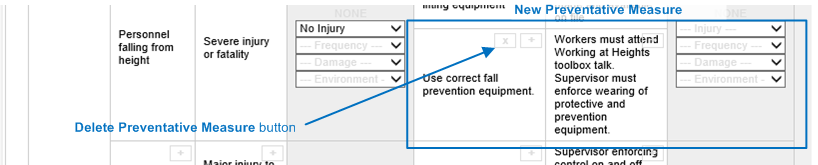
An added Preventative Measures can be removed from the list by clicking the Delete button but only if not yet used by another Project in which case no Delete button will be displayed.
A Preventative Measures with a scope of This project only is of course never used by other projects so should always allow deletion.
One or more Control Measures are identified for each Preventative Measure aimed at providing control over Preventative Measures
To add a Control Measure to the currently selected Preventative Measure, the logged-in user must click on the + button in any of the existing Control Measure cells. The New Risk Activity window is displayed.
The Task, Potential Hazard, Possible Result and Preventative Measures fields are not editable but displays the value of the parent Preventative Measures, it's Possible Result, it's Potential Hazard and its parent Task fields. The logged-in user must supply the new Control Measure value. Additional Control Measures can be added once the new Control Measure has been added.
The logged-in user must supply the new Control Measure value.
The logged-in user can also set the scope of the added Control Measure by selecting the option in the Valid for field.
Click the Done button to save the changes or the Cancel button to discard the changes.
The new Control Measure is displayed at the bottom of the list of Control Measures.
The new Control Measure is displayed at the bottom of the list of Control Measure of the parent Preventative Measures.

An added Control Measures can be removed from the list by clicking the Delete button but only if not yet used by another Project in which case no Delete button will be displayed.
A Control Measures with a scope of This project only is of course never used by other projects so should always allow deletion.
The Residual Risk column provides the user with the interface to assess the initially identified hazards after allying the suggested Preventative Measures and Control Measures. Each hazard is assessed in terms of four categories of risk namely severity of Injury, Frequency of occurrence, potential financial Damage or loss and Environmental impact. The rating process is exactly the same as for Initial Risks. See Initial Risk